


Breaking In a Bandsaw Blade: Why It Matters and How to Do It Right!
Give your blade a longer life and cleaner cuts with this must-know break-in guide for beginners.
Intro: Give Your Blade the Best Start in Life
A brand new bandsaw blade might look sharp and ready to rip into your next job—but if you skip the break-in process, you’re cutting its life short (pun intended).
Properly breaking in your bandsaw blade isn’t just some technical extra; it’s essential for getting the most out of your investment.
In this article, we’ll walk you through the why and how of breaking in a bandsaw blade.
Whether you’re working with bi-metal, carbon, or carbide blades, this guide will help you increase blade life, reduce wear and tear, and keep your cuts clean and consistent. Beginners welcome!
Why Break-In Matters
• To you for better return on investment
• To us so you truly get what you should out of our premium product
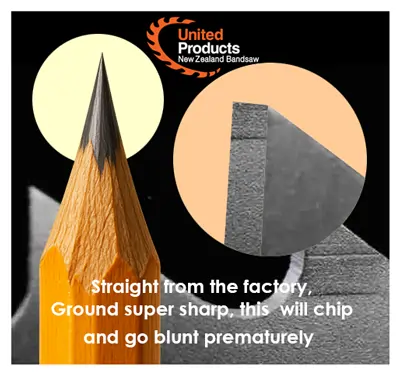
Think of a new bandsaw blade like a freshly sharpened pencil: press too hard too soon, and you’ll snap the tip. Bandsaw blades are no different. The tips of new teeth are razor sharp with micro-fine edges that need to be gently worn into shape, or they will fracture and blunt prematurely

- Extend blade life significantly
- Reduce the risk of chipping or tooth strippage
- Improve cut quality
- Save money on replacements
Skipping break-in often leads to premature tooth damage, increased vibration, noisy operation, and ultimately, downtime.
What Happens During Break-In?
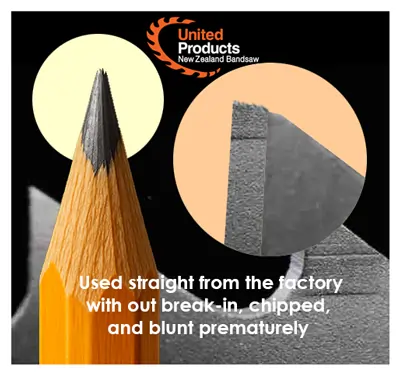
When a blade is first used, the sharp edges of the teeth need to be conditioned. This is done by gradually easing the blade into full cutting pressure. Think of it as a gentle warm-up rather than sprinting off the start line.
This conditioning wears a small radius into the tooth tip—essentially honing it—so it can withstand normal cutting pressures without breaking down.
General Break-In Steps (For Most Blades)
- Set the Correct Blade Speed
Refer to your blade or material chart and set your bandsaw to the recommended cutting speed for the material you’re sawing - Reduce Feed Pressure
For the first cuts, reduce feed pressure to around 50% of normal. Some manufacturers suggest a 20–50% reduction depending on material hardness (softer materials = bigger reduction). - Make Your First Cuts
Begin cutting, watching for chip formation. You should be making chips—not dust. Listen for vibration or chatter; if it gets noisy, back off a bit more on the feed rate. - Gradually Increase Feed Pressure
After the first 100–300 cm² of material (or roughly 10–20 minutes of continuous cutting), slowly increase feed pressure in steps until you reach normal production rates.
Break-In by Blade Type
Bi-Metal Blades
- Speed: 75% of standard for material
- Feed: Start at 50%, ramp up gradually
- Time: Around 15 minutes or 500 cm of cutting
Carbide Blades
- Follow same speed/feed reduction as bi-metal
- Carbide tips are harder, so vibration control is critical
- Use coolant and ensure stable clamping to reduce chatter
Carbon Blades
- Typically used on lighter-duty machines
- Can still benefit from break-in but may wear faster regardless
Tips for a Successful Break-In
- Minimise Vibration: Loose blade guides, poor clamping, or uneven feed will increase the risk of premature tooth wear. Secure your material and double-check your setup.
- Use Coolant or Lubrication: Proper coolant flow reduces friction and keeps the tooth tips from overheating, especially with harder materials.
- Watch Your Chips: Silver and curled = good. Blue or powdery = too fast or too much feed.
- Monitor Blade Noise: Excessive noise early on is a red flag. Ease off the pressure.
Common Mistakes to Avoid
- Jumping straight into full production feed
- Using the wrong speed or TPI for the material
- Ignoring chip load and cut resistance
- Cutting without coolant
Break-In FAQs
Q: Do I need to break in every blade?
A: Yes, even if you’re in a rush. The small time investment pays off in blade life and quality of cut.
Q: How do I know it’s broken in properly?
A: Once you’ve gradually reached normal feed rates without vibration, chipping, or heat discoloration, you’re good to go.
Q: Is break-in different for structural steel?
A: Slightly—reduce feed a bit more and be cautious of vibration from thin-walled or bundled materials.
Wrapping Up: A Little Patience Pays Off
Breaking in your bandsaw blade might sound like a chore, but it’s really just smart sawmanship. Think of it as preventative care—a few extra minutes that save you hours of frustration later.
So next time you unwrap a shiny new blade, don’t rush it. Treat it right from the start, and it will return the favour in clean, accurate, and long-lasting cuts.
Want help choosing the right blade or cutting speed? The team at United Products is here to help. Call us on 0800 252 377 or visit unitedproducts.co.nz for expert advice and top-quality blades.

Leave a Reply
You must be logged in to post a comment.